| The barrel, or body, screws into the cap. The inner cap, also shown cut away, is pressed permanently into the cap, and the lip of the inner cap mates with the flat face of the section to form an airtight seal when the cap is screwed on tightly. This seal keeps the pen from drying out when it is not being used. It is also the inner cap that determines how far into the cap the barrel can be screwed. This pen’s nib is very close to the end of the inner cap; the nib must be short enough that it does not touch the end of the inner cap, or the nib can be damaged. Breather holes in the cap (not visible in this figure) are placed between the inner cap and the cap band so that air can flow around the section when the pen is capped. The breather holes allow air to enter quickly when the cap is removed; this prevents creation of a partial vacuum that would draw ink out of the pen into the interior of the cap. |
 |
| The clip is fitted through a hole in the side of the cap, and tabs on the clip are then bent over inside the cap to hold the clip in place. The hole for the clip is above the inner cap; thus, the clip does not compromise the inner cap’s airtight seal. |
 |
| The cap band is fitted into a groove in the cap. The most usual method of attaching the cap band is to start with an oversize piece and roll it in a die to reduce its diameter until it fits into the groove. |
 |
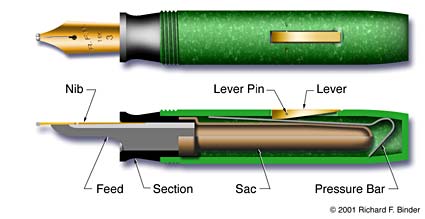
| Under the Cap: The next figure shows the pen without its cap. In this figure’s lower view, the pen is shown from the side, with the barrel, feed, section, and nib cut away to show their interior construction. |
 |
 |
 |
| Here, you can see how the nib and feed are fitted into the section. After the sac is attached, the section is then fitted into the barrel. All of these parts are press-fitted together; there are no threads, and no adhesive is used. |
 |
| The sac is cemented to the section with shellac. The part of the section to which the sac is fastened is often called the nipple. (In this figure, the sac is partially cut away so that you can see how it fits around the nipple.) The sac’s diameter is small enough that that the sac does not touch the inside of the barrel. (Not all pens are carefully fitted this way.) This design prevents heat transfer from the user’s hand into the ink; if the ink warms, it will expand and can leak from the pen. |
 |
| The lever is fitted into a slot in the barrel. This pen uses a small steel pin, inserted through a hole in the barrel, to secure the lever in place. Later pens often use a circular spring clip that fits into a groove in the inside of the barrel. |
 |
| The pressure bar is a springy strip of steel shaped so that when it is inserted into the barrel, it is wedged in place at the back end of the barrel. When you lift the exposed end of the lever, its opposite end presses the pressure bar downward to squeeze the sac. Releasing the lever releases the pressure bar, allowing the sac to expand and draw ink in. |
 |
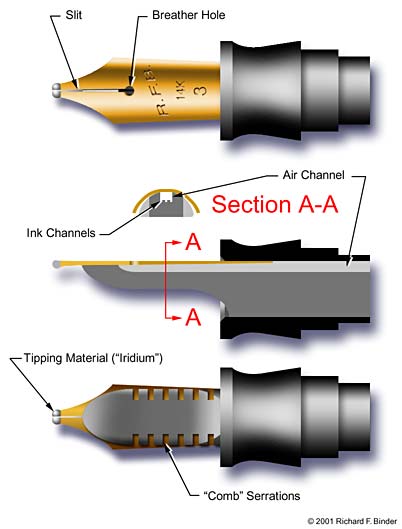
| The Nib and Section: The nib is thicker toward its tip than it is at its back end, or ”root.” This taper allows the nib and feed to be inserted into the section; then, as they are driven farther into place, the added thickness of the nib creates more friction and pressure to hold the assembly together. The next figure illustrates the nib and section. |
 |
 |
 |
| Looking at the top view and the cross-section, you can see that the nib’s breather hole is over the feed’s air channel. This allows a flow of air into the pen; the flow of ink in the ink channels is controlled by the air passing in the other direction through the feed. The breather hole also reduces the tendency of a nib to crack as it bends when pressed firmly against the paper. You will notice that there is nothing to seal the ink flow completely; a fountain pen’s ink flow is actually a controlled leak. The nib touches the feed right over the channel, but it spreads away from the feed on the sides; this allows a quantity of ink to build up in the “reservoir” between the nib and the feed. |
 |
| The earliest feeds did not have the ”comb” serrations shown here. A plain feed is unable to capture ink rapidly enough under changing conditions, and occasionally the pen will throw a blot. Adding the serrations gave the feed more “reservoir” capacity to prevent this problem. |
 |
| Capillary action draws ink from the feed down the slit to the tip, where it can be delivered to the paper. High-quality nibs like this one are made of gold and are tipped with a hard alloy that will not wear out as rapidly as the softer gold. This alloy is usually called “iridium” even though modern tipping alloys contain very little actual iridium. |


